Tuesday, August 30, 2011

Air leaks

Today was the first chance I've had to do anything to the bus in a couple of weeks.  I have started it the past two Sundays and moved it around the lot a bit just to stir fluids up, but that has been it.


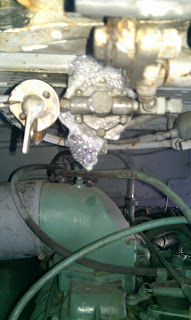
Last Sunday I noticed that after I shut down the engine I could hear lots of air leaking from under the front.  So today I started poking around with my soapy water bottle to see what I could find.  Found a fitting or two that needed tweaking but the big culprit was the silver square thing in the picture.  Later found it is a quick release valve (a part of the air brake system) and it is leaking out of the side.  A call to Luke and U. S. Coach told me what it was and he is sending me a rebuild kit for it.


For some time I've had a leaking pressure regulator for the blower belt tensioner but I had no idea it was leaking this bad.  While soaping down fittings, I came to the engine compartment and inspected a few.  The regulator is leaking hugely as you can see by the large bubbles it blew.  Luke has the rebuild kits in stock for this too and is sending it to me.


Tuesday, August 16, 2011

Bad wood in the rear


LaRon took a load of debris to the dump today.  That allowed me to clean up the rear end and move things around a bit.  First item on the list was to inspect the cause of a soft spot in the pergo flooring, curb side, in the bedroom.  I removed a piece of the flooring and just as I suspected, found bad wood.  I ended up removing all of the pergo flooring as the more I removed the more bad areas I found.  You can see the worst area in this picture to the right.  The wood there was still very wet and spongy.  Parts of it pulled away like tearing a sheet of paper.   
The question now is how much is bad and how deep.  I spent the rest of the afternoon removing the bad plywood on top of the original bus floor.  You can see in the picture here that the damage goes all the way across the bus to the other street side wall.  While the wood is not wet on this side, I decided it best to remove all damaged sections.


Here I show a picture of the bad plywood all cut out of the bedroom area.  The original bus flooring seems to be ok here except for the two spots at the back wall where the blue covering is missing.  I removed the bus plywood floor, which was dry but still rotted,  exposing the metal sheeting below.  The metal sheeting is in rough shape but it is not structural so it should be ok.  While the bus floor is definately showing it's age I believe it to not require removing.  I am not sure what I will do next.  I need to remove a couple of sections of the metal wall covering under the windows to inspect inside the wall and the framing.  I suspect that I'll find rust in a few areas.   Stripping the conversion out of the inside of the bus has been a big undertaking and it pretty much brings the project back to square one.  Finding the bad and still wet wood today reassured me that the tear out is necessary.  It can look pretty on top but be rotted below.


Saturday, August 13, 2011

Kitchen out

Last piece of the kitchen came out today.  My previous post was about removing the gas water heater.  I had to remove that before I could resume demolition of the kitchen cabinet base and remaining partition wall between the kitchen and the bath.  As you can see from this picture, the wall is gone, kitchen base is gone, water heater is gone, and the hole in the side of the bus has been covered over temporarily with some of the white sheeting from the tear out of the ceiling covering.  Not sure what the white sheets are called yet, but I think I may go back with similar as a ceiling covering when finished.  It is durable, washable, and reflects light well.  The next step will be several trips to the dump.

Water heater out

Water heater is out.  Actually wasn't very difficult.  Took the outside cover off, then four screws holding the outside rim on to the inside part of the heater, then 3 or 4 screws the P/O used to screw into the wood frame, took loose the gas line, and pryed the rim off.  The I went inside, and Barry pushed from the outside while I pulled and wiggled from the inside.  I have no plans to keep the gas water as I think I want to install a larger electric water heater in the bay below.  My plan at this point is to attempt to sell the heater on craigslist.

Sunday, August 7, 2011

Kitchen mostly gone

Today I managed to demo most of the remaining kitchen cabinets and counter area.  Removing the cook top was not much of an issue.  On the label shown below it says the unit should not be any closer than 6" from the center of the burner to the closest combustible material.  It was placed exactly 6" as stated, but the outside of the burner was only 1" from the adjacent wall and that just looked way to close for my comfort.  So on the rebuild I will place the unit further than this from the sidewall.
My plan was to save the two compartment stainless sink but the P/O had no intentions of it ever being removed as it was abundantly glued down on all sides... so the sink goes to the dump along with the ugly blue countertop.


Since the countertop area is not large, I am thinking about moving the sink down more toward the other end of the counter and thereby leaving an open work space in the middle between the sink and the cook top.


The three burner cook top shown here should be adequate for our stove top needs, but with this we will not have an oven.  The other option would be to get an apartment size gas stove which would have both but I think in the mean time I might just use this cook top and the small electric countertop convection oven I have at home.  I am not a fan of the microwave at all so I have no plans on including one of these.


From  the picture here you can see I have quite a load to go to the dump.   I have already arranged with LaRon to take a load Tuesday.  As it turns out it looks like I might have two loads.  I still have the base of the kitchen cabinet left and half of one partition wall to still come out.    After I clean up the inside of the small stuff and sweep it out good, then maybe I can start work on removing part of the bus ceilling and old fiberglass insulation.


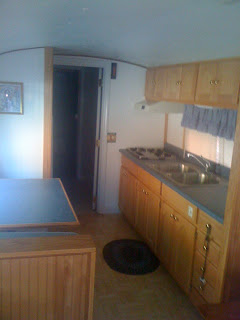
Here are before and after pictures of the kitchen.
All that is left here is the cabinet base and the gas RV water heater.  

Tuesday, August 2, 2011

New gauges

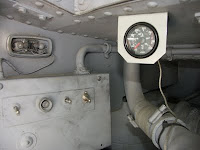
This past Sunday I installed my new volt gauge in the dash.  I was just too tired after the previous days demolition to do much so I picked the gauge install. The volt gauge is the small one on the right.  The picture didn't come out very well but it is a very nice gauge from Isspro.  Now I can tell exactly what the new alternator is doing and when charging and when not.
 When I bought the bus it did not have a volt gauge in the dash or an oil pressure or water temp gauge in the rear engine room.  While the volt gauge is not a must have, the other two are.  So when I first put the bus in the shop at Republic  Diesel for those oh many months,  I had them install the direct oil pressure and water temperature gauges in the rear.  That way I know for sure what the correct readings are.  Old dash gauges tend to not be nearly as accurate.